The world of art and creativity is currently undergoing a veritable revolution, thanks to advances in the field of artificial intelligence (AI). These new tools can now automatically generate illustrations, photos and even album, single and other cover art in a matter of minutes.
Among these tools are solutions such as MidJourney and DALL-E, but also Leonardo AI, which stands out for its remarkable performance, flexibility and ease of use.
In this tutorial, we’ll look at how to generate cover art relatively easily with this fun and surprisingly effective solution. For the most part, we’ll be using the Leonardo AI artificial intelligence image creation service, as well as Adobe’s Firefly, and then the Pixlr website to finalize our cover art.
You’ll need between 15 minutes and 1 hour of work or more, depending on your requirements and the modifications you make to the image you’ve generated.
So how do you make a single cover with artificial intelligence?
To make an album cover with Leonardo AI, you’ll need to create an account to access the creation interface. You’ll then be able to generate an image by entering a Prompt, make a first upscale in Leonardo AI and another upscale in an upscaler of your choice to obtain a size of around 3000 by 3000 pixels. If you wish, you can then integrate the desired elements using Leonardo AI’s Inpainting tools, and create stylized text and integrate it into your image using FireFly. Finally, you can finalize the image by assembling and modifying everything in Pixlr.
Please note that we’re talking here exclusively about designing the front cover of the album sleeve, not the entire cover of a CD (with track names, track lengths, song lyrics with cutting line, etc.)! It should also be pointed out that the final image will not be optimized for printing (72 dpi instead of the recommended 300 dpi).
Here’s an example from this tutorial:
You don’t have to follow this tutorial to the letter!
What is Leonardo AI?
Before getting to the heart of the matter, it’s time to introduce Leonardo AI.
In a nutshell, this Web application uses deep learning and probabilistic inference techniques to produce realistic, aesthetically pleasing images with ease.
It offers several prediction models trained on millions of works of art and photos to guarantee a wide variety of styles and renderings.
Leonardo AI uses artificial intelligence from Stable Diffusion, an open source image generation tool(github). The online service is free and uses a system of credits that are spent during image generation.
Some features are not accessible with free accounts, but this won’t hold you back in this tutorial. You will still need to log in to the site and use your e-mail address to create an account.
Thanks to its intuitive interface, it’s possible to create original compositions by writing a descriptive prompt, without requiring extensive drawing skills.
The descriptive prompt (usually called "Prompt") is the descriptive text of the image you wish to generate, using phrases and keywords separated by commas.
It’s important to point out that although AIs can create sometimes impressive images in a relatively short time, they are not without their imperfections and often require a minimum of patience and know-how to achieve a suitable and satisfactory result.
For example, if you want to generate a person’s image, you’re likely to have problems with his or her hands. Since hands are a part of the body that changes shape and orientation, they are sometimes in the wrong position, or have extra or missing fingers. The simplest solution is to make your character cross-armed or with his hands behind his back 😄.
What image size should I use for Cover Art?
It’s important to know that most online streaming platforms (such as Apple Music, Spotify, Amazon Music and others) recommend an image format of around 3000×3000 pixels for the album or single covers you submit for your tracks. It’s better to have an image that’s too big and to reduce its size than to have an image that’s too small and to have to enlarge it at the risk of blurring it.
Step 1: Create an account on Leonardo AI
To get started, go to the official Leonardo AI website here:
You can sign in directly with a Google or Apple account for simplicity and speed, or fill in the [Email] and [Password] fields and click [Sing_In]. If you already have an account, log in directly using the appropriate fields.
After confirming your registration, you’ll receive a confirmation e-mail with an activation link. Follow this link to complete the procedure and access Leonardo AI’s main interface.
Please note that it may take a few minutes before you receive the e-mail.
Step 2: Choose a generation model
To create your image, you’ll need to choose a template from among those available on Leonardo AI. There are a number of templates, each with its own specialties and recommended image size. You can always change them during the various image modification phases (Inpainting).
The templates used by Stable Diffusion (the artificial intelligence used by Leonardo AI) are files created from images on which they are trained (photos, drawings, paintings, 3D images, etc.). They act as resources for the artificial intelligence during image generation. During the image creation process, Stable Diffusion's artificial intelligence generates an initial image containing noise, similar to that seen on old televisions for example 📺. It then attempts to remove this noise using algorithms specific to the selected model. The process being guided by a Prompt provided by the user to influence the generation of the final image.
Once logged into your Leonardo AI account, click on the “Image Generation” button at the top left of the screen:
You’ll be taken to a new page with various configuration options in the left-hand column. Start by choosing a generation style by clicking on the [Finetuned_Model] button (image below).
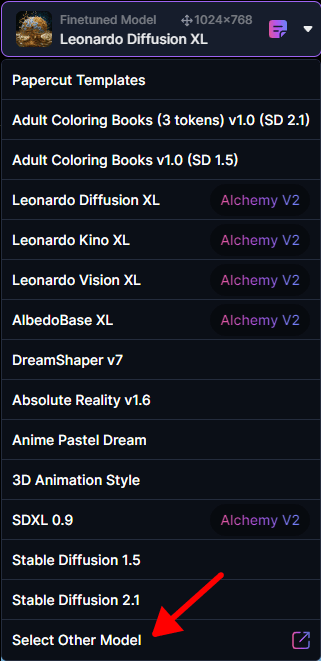
To display all available models, click at the very bottom on [Select_Other_Model] (see image on left). A pop-up window will appear with all the models available for Leonardo AI.
You can test these different models and see the impact they have on image generation. Some models are generalist and have been trained on a very wide range of images and works, while others are more specialized on themes such as manga, paintings or 3D images, for example.
You’re free to use the template of your choice, but it’s easiest to use the basic templates offered by Leonardo AI, which will enable you to generate all types of image styles.
For our album cover, we recommend choosing a template that generates 1024×1024 images without distortion. Choose templates with “XL” in their names, as these will enable you to generate large images without image distortion.
Step 3: Set generation parameters
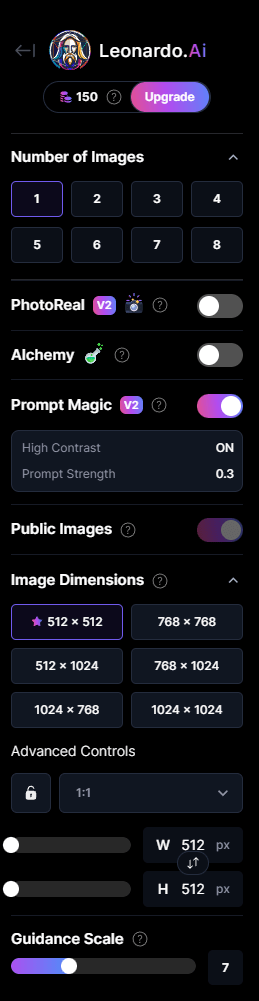
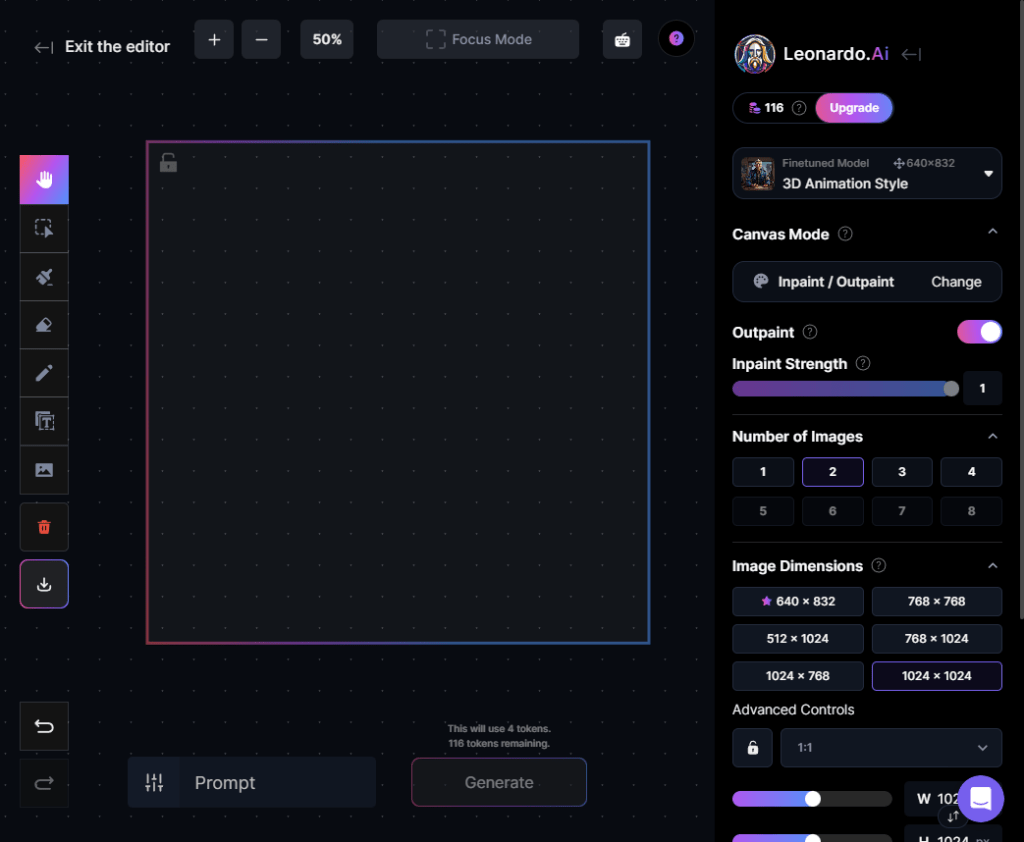
Once you’ve chosen a template, take a look at the left-hand column. Here you’ll find various settings for adjusting image size, Prompt level and other parameters.
To begin with, select “1” in the [Number_of_Images] box to generate 1 image at a time. You can also generate several images at once from the same prompt, so you can choose which image you want to work with. Remember that you have a limited number of credits per day and that each generation costs you credits.
Next, choose the size 1024×1024 in the [Image_Dimensions] section. Once again, it’s best to stay close to the basic values of the dimensions with which your models have been trained, at the risk of seeing deformations of subjects and elements as they are generated in the image (double faces, stretching, etc.).
Some models are less sensitive to these problems than others, so carry out a test and continue if there are no problems in the result.
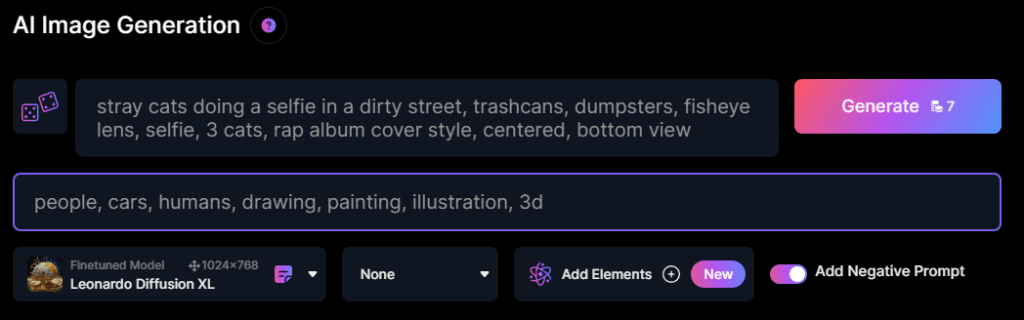
Step 4: Write a descriptive prompt (Prompt)
The central part (bottom) of the Leonardo AI interface is devoted to writing a descriptive prompt. It’s essential to mention the key elements of your image, such as the dominant colors, the image style (e.g. painting, photo, black & white), the objects represented, etc.
Be as precise as possible in the choice of words in your description, to effectively guide the generation process. You’ll probably have to modify and refine your Prompt between each image generation in order to improve it or to adapt it to the AI in case it doesn’t interpret your queries correctly.
It’s important to emphasize that your descriptive prompt must be written in English, otherwise you run the risk of having images that are inconsistent or inadequate to your requests. Use Google Translate to translate from your language into English if necessary.
Most online AI image generation services will not allow you to use words referring to certain historical facts, political figures or celebrities, words of a sexual or racist nature, or any other content recognized as potentially inappropriate on their platform.
Also, bear in mind that Leonardo AI remains an algorithm and not a human capable of intuitively understanding your intentions (even if technology is advancing fast). Ambiguous or subjective terms such as “mysterious atmosphere” or words like “incredible” may be ignored or not interpreted.
Also note that a Prompt such as “a woman dressed in blue with a green rose” could possibly result in an image of a woman in green with a blue rose, as AIs sometimes find it difficult to keep a link between colors and desired objects. For simplicity’s sake, favor concrete, simple and objective indications with a single central subject.
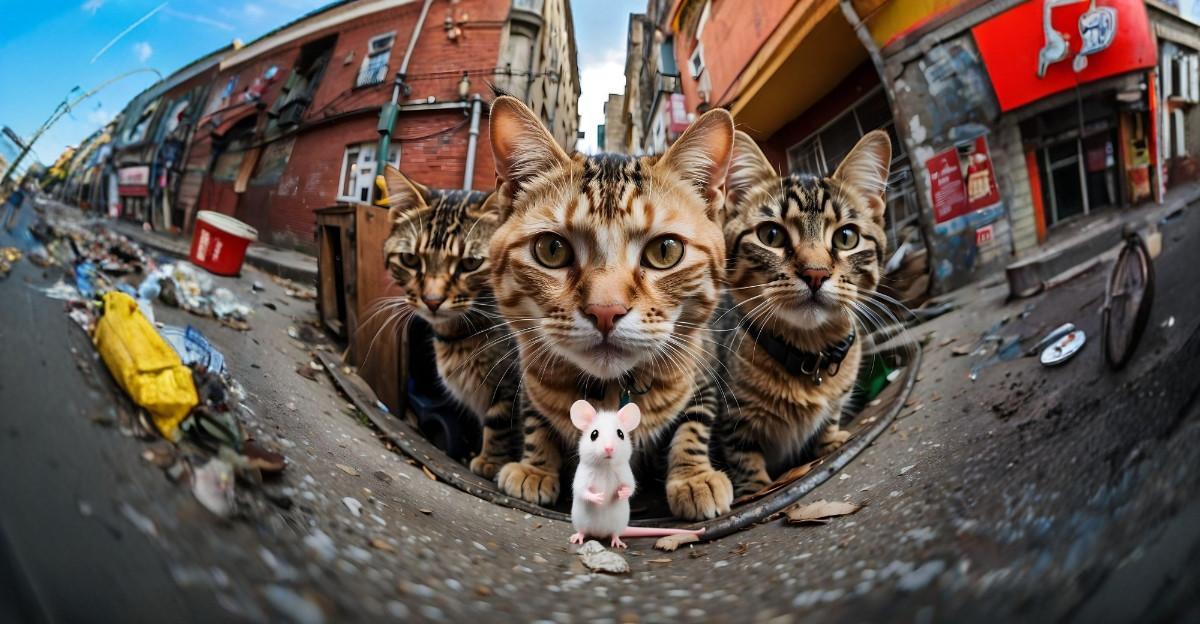
In our example, we’ll use this Prompt:
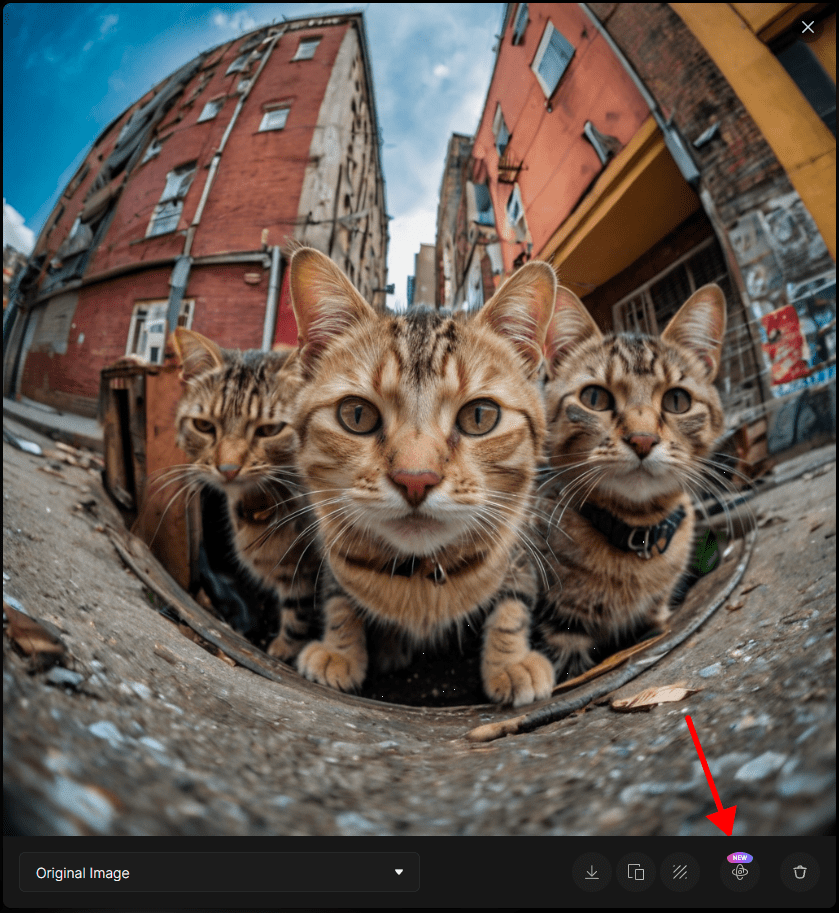
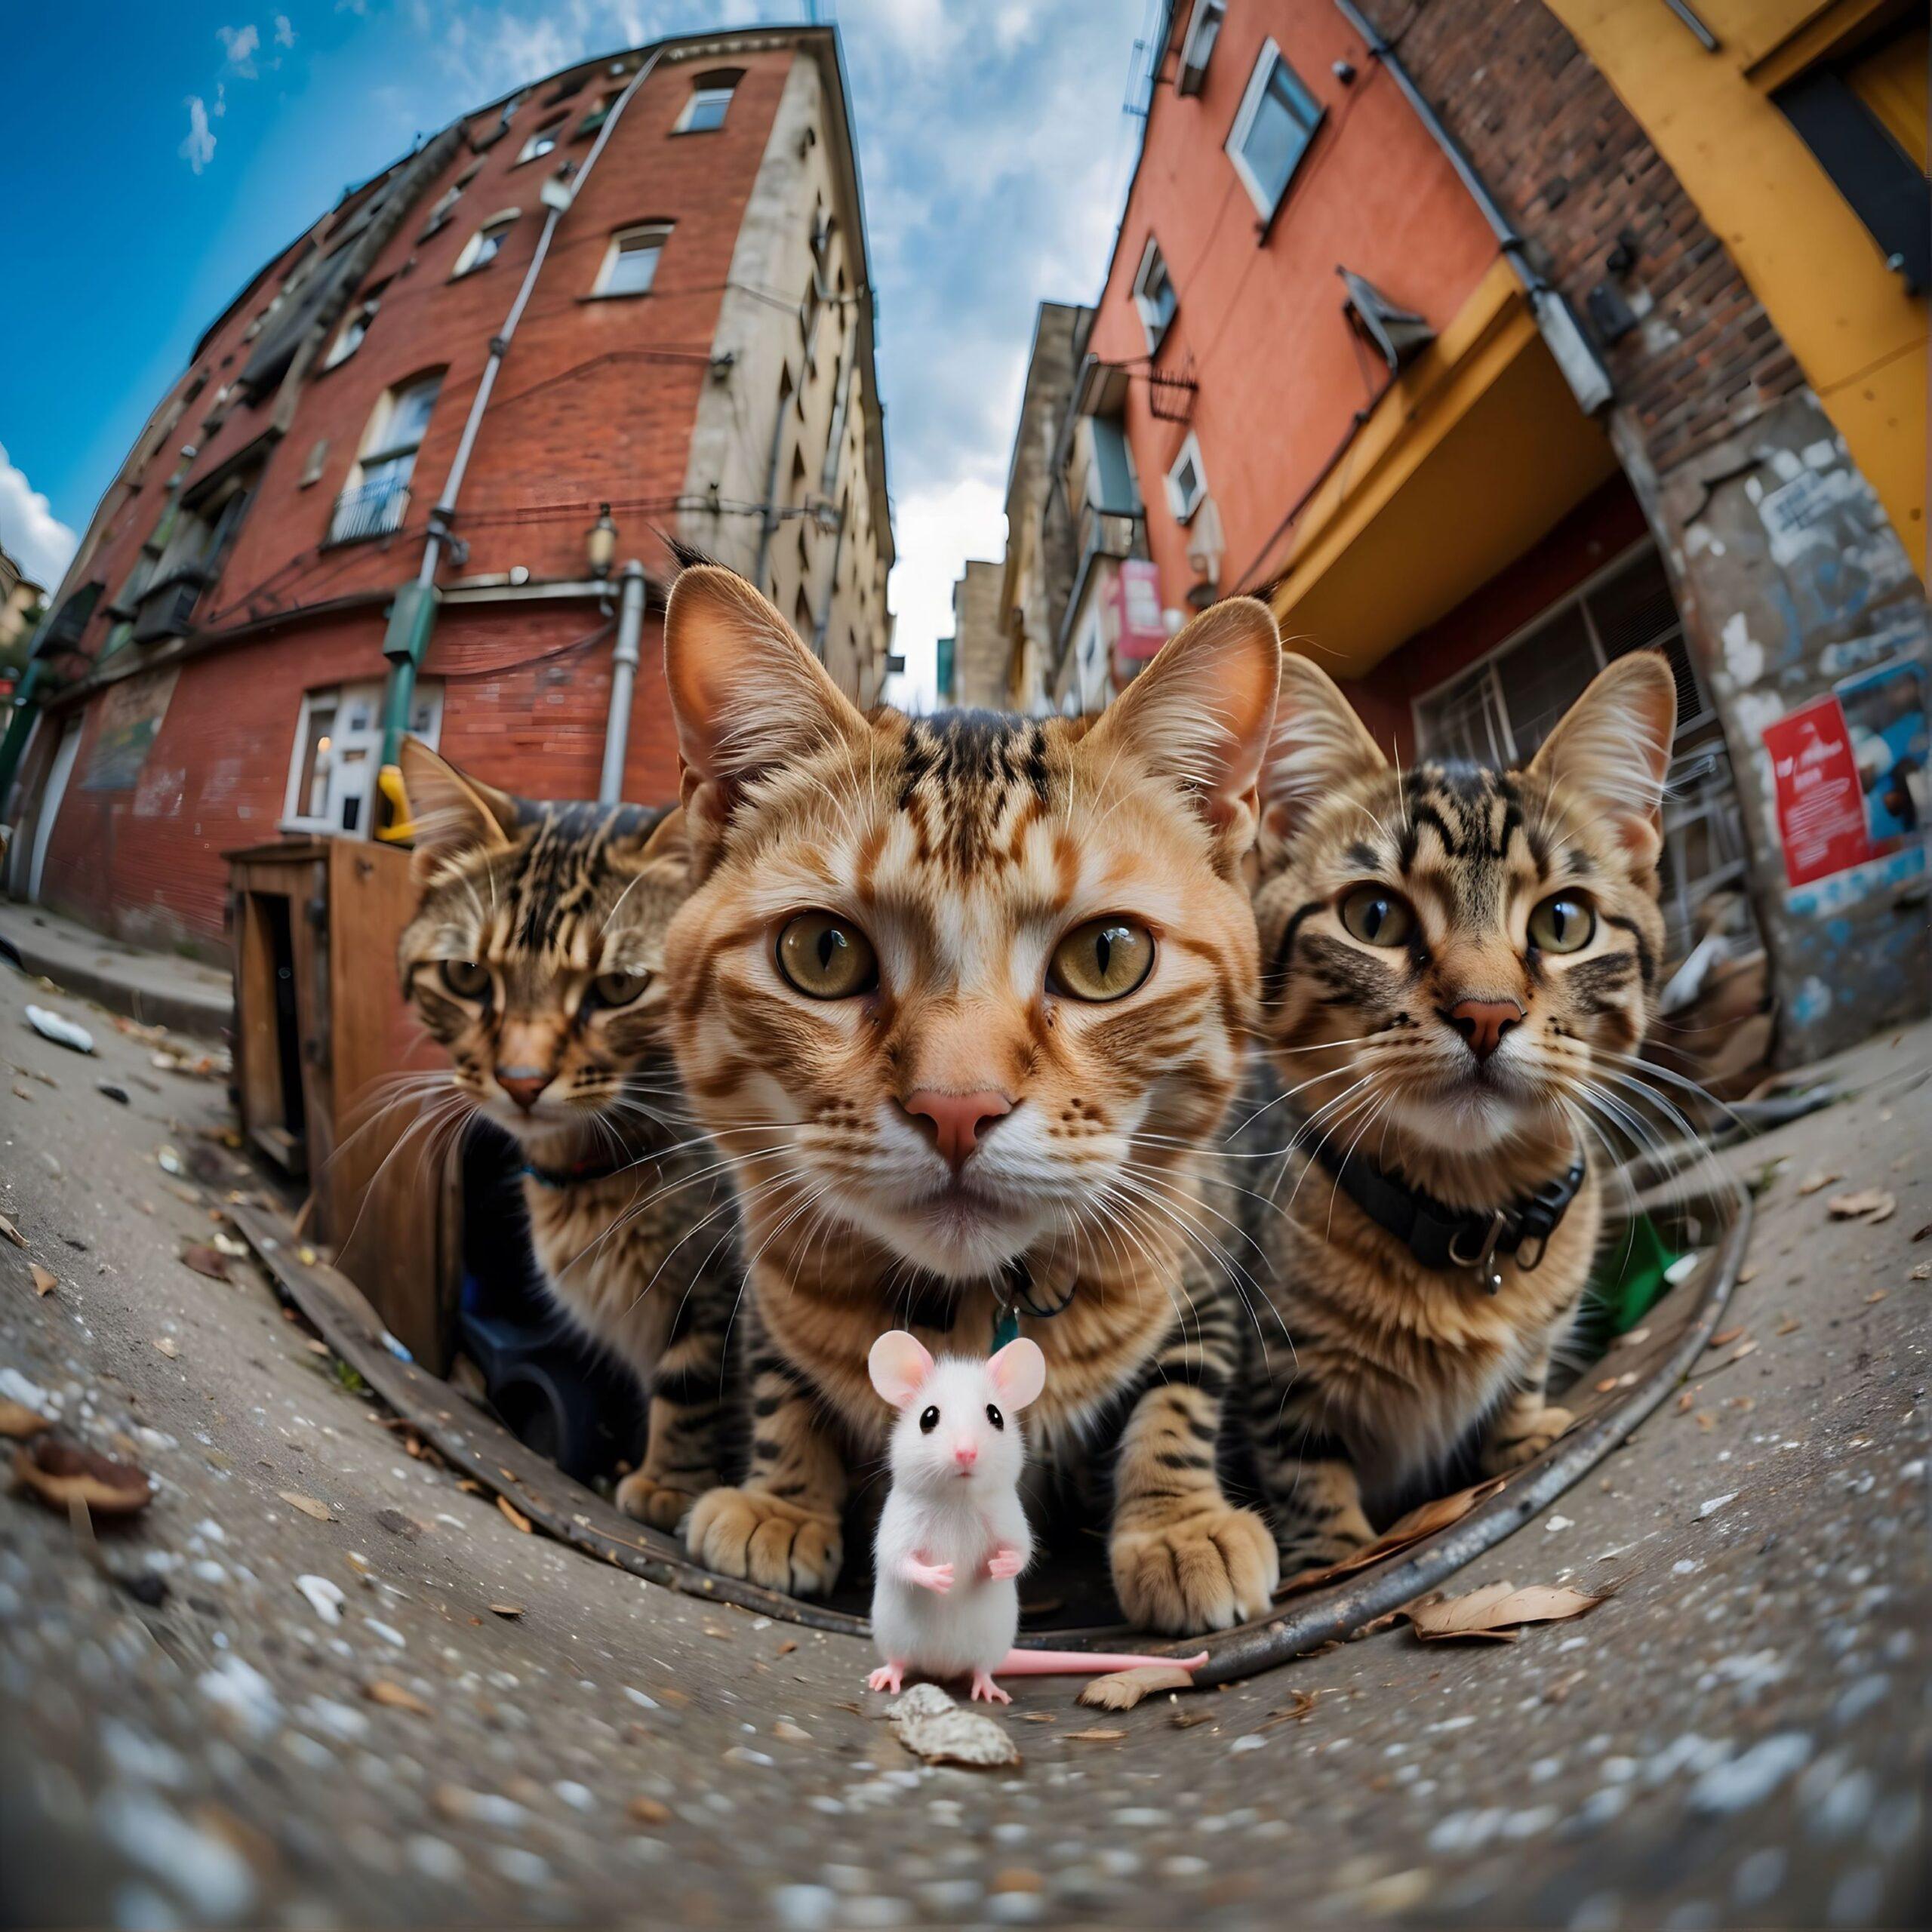
“stray cats doing a selfie in a dirty street, trashcans, dumpsters, fisheye lens, selfie, 3 cats, rap album cover style, centered, bottom view“
Add a few keywords describing the angle of view, some background elements and a photo style, separating them with commas.
You can also activate [Add_Negative_Prompt] to have an additional field underneath, allowing you to add to the descriptive prompt keywords for things you don’t want to appear in the image, such as cars or people:
The more complex your descriptive prompt, the more the image generator will follow restrictive guidelines that will alter the final rendering. Generating an image with a Prompt the size of a paperback book won’t necessarily make your image more beautiful.
On the contrary, it may increase the risk of your Prompt being misinterpreted by the AI, resulting in an image that is sometimes too busy, or simply inconsistent with your request. But the result can sometimes cause a few giggles 😁.
Keep your requests simple and assume that you can always add elements to your main image without having to integrate everything into a single Prompt. In fact, it’s possible to modify an image to incorporate whatever you want, again using Leonardo AI’s “Inpainting” technique, which is what we’ll see later in this tutorial.
Step 5: Launch generation
When you’ve finished refining your descriptive prompt, click on the pink [Generate] button in the top right-hand corner of the screen. The number of credits spent on generating the image will be noted on the button itself.
Leonardo AI will then analyze your request and produce one or more images. Depending on the complexity of your request and current server load, this operation usually takes 30 seconds.
Note that you’ll have a total of 150 generation credits available free of charge every day, more than enough to make a beautiful image and carry out retouching if required. All the images you generate will remain available on your account and can be reworked later if you run out of credits for the day.
Once the image has been rendered, it will be displayed in the gallery (tab [Generation_History]). Click on one of the images in the gallery to display it in larger size.
If the image doesn’t suit you, you can always generate another until you’re satisfied. If none are to your liking, we recommend that you modify your Prompt and check the image generation parameters.
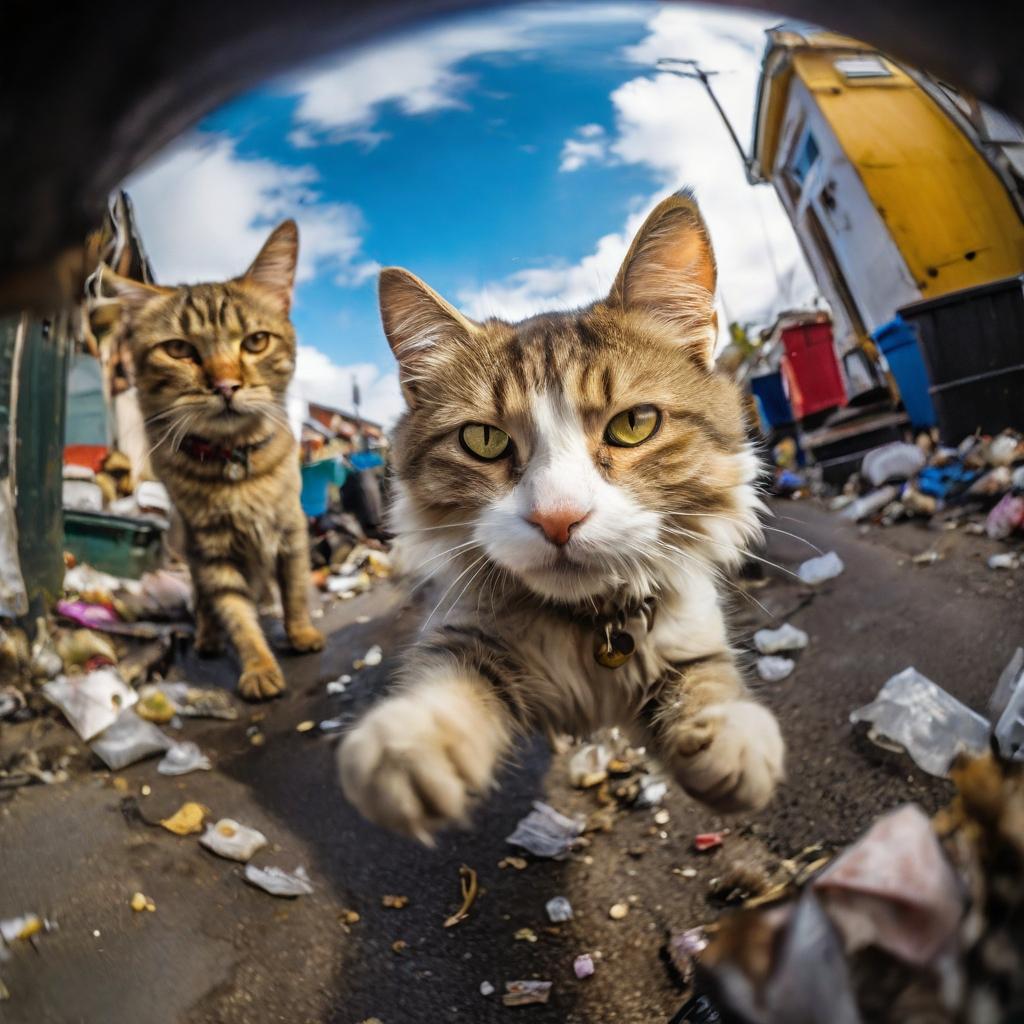
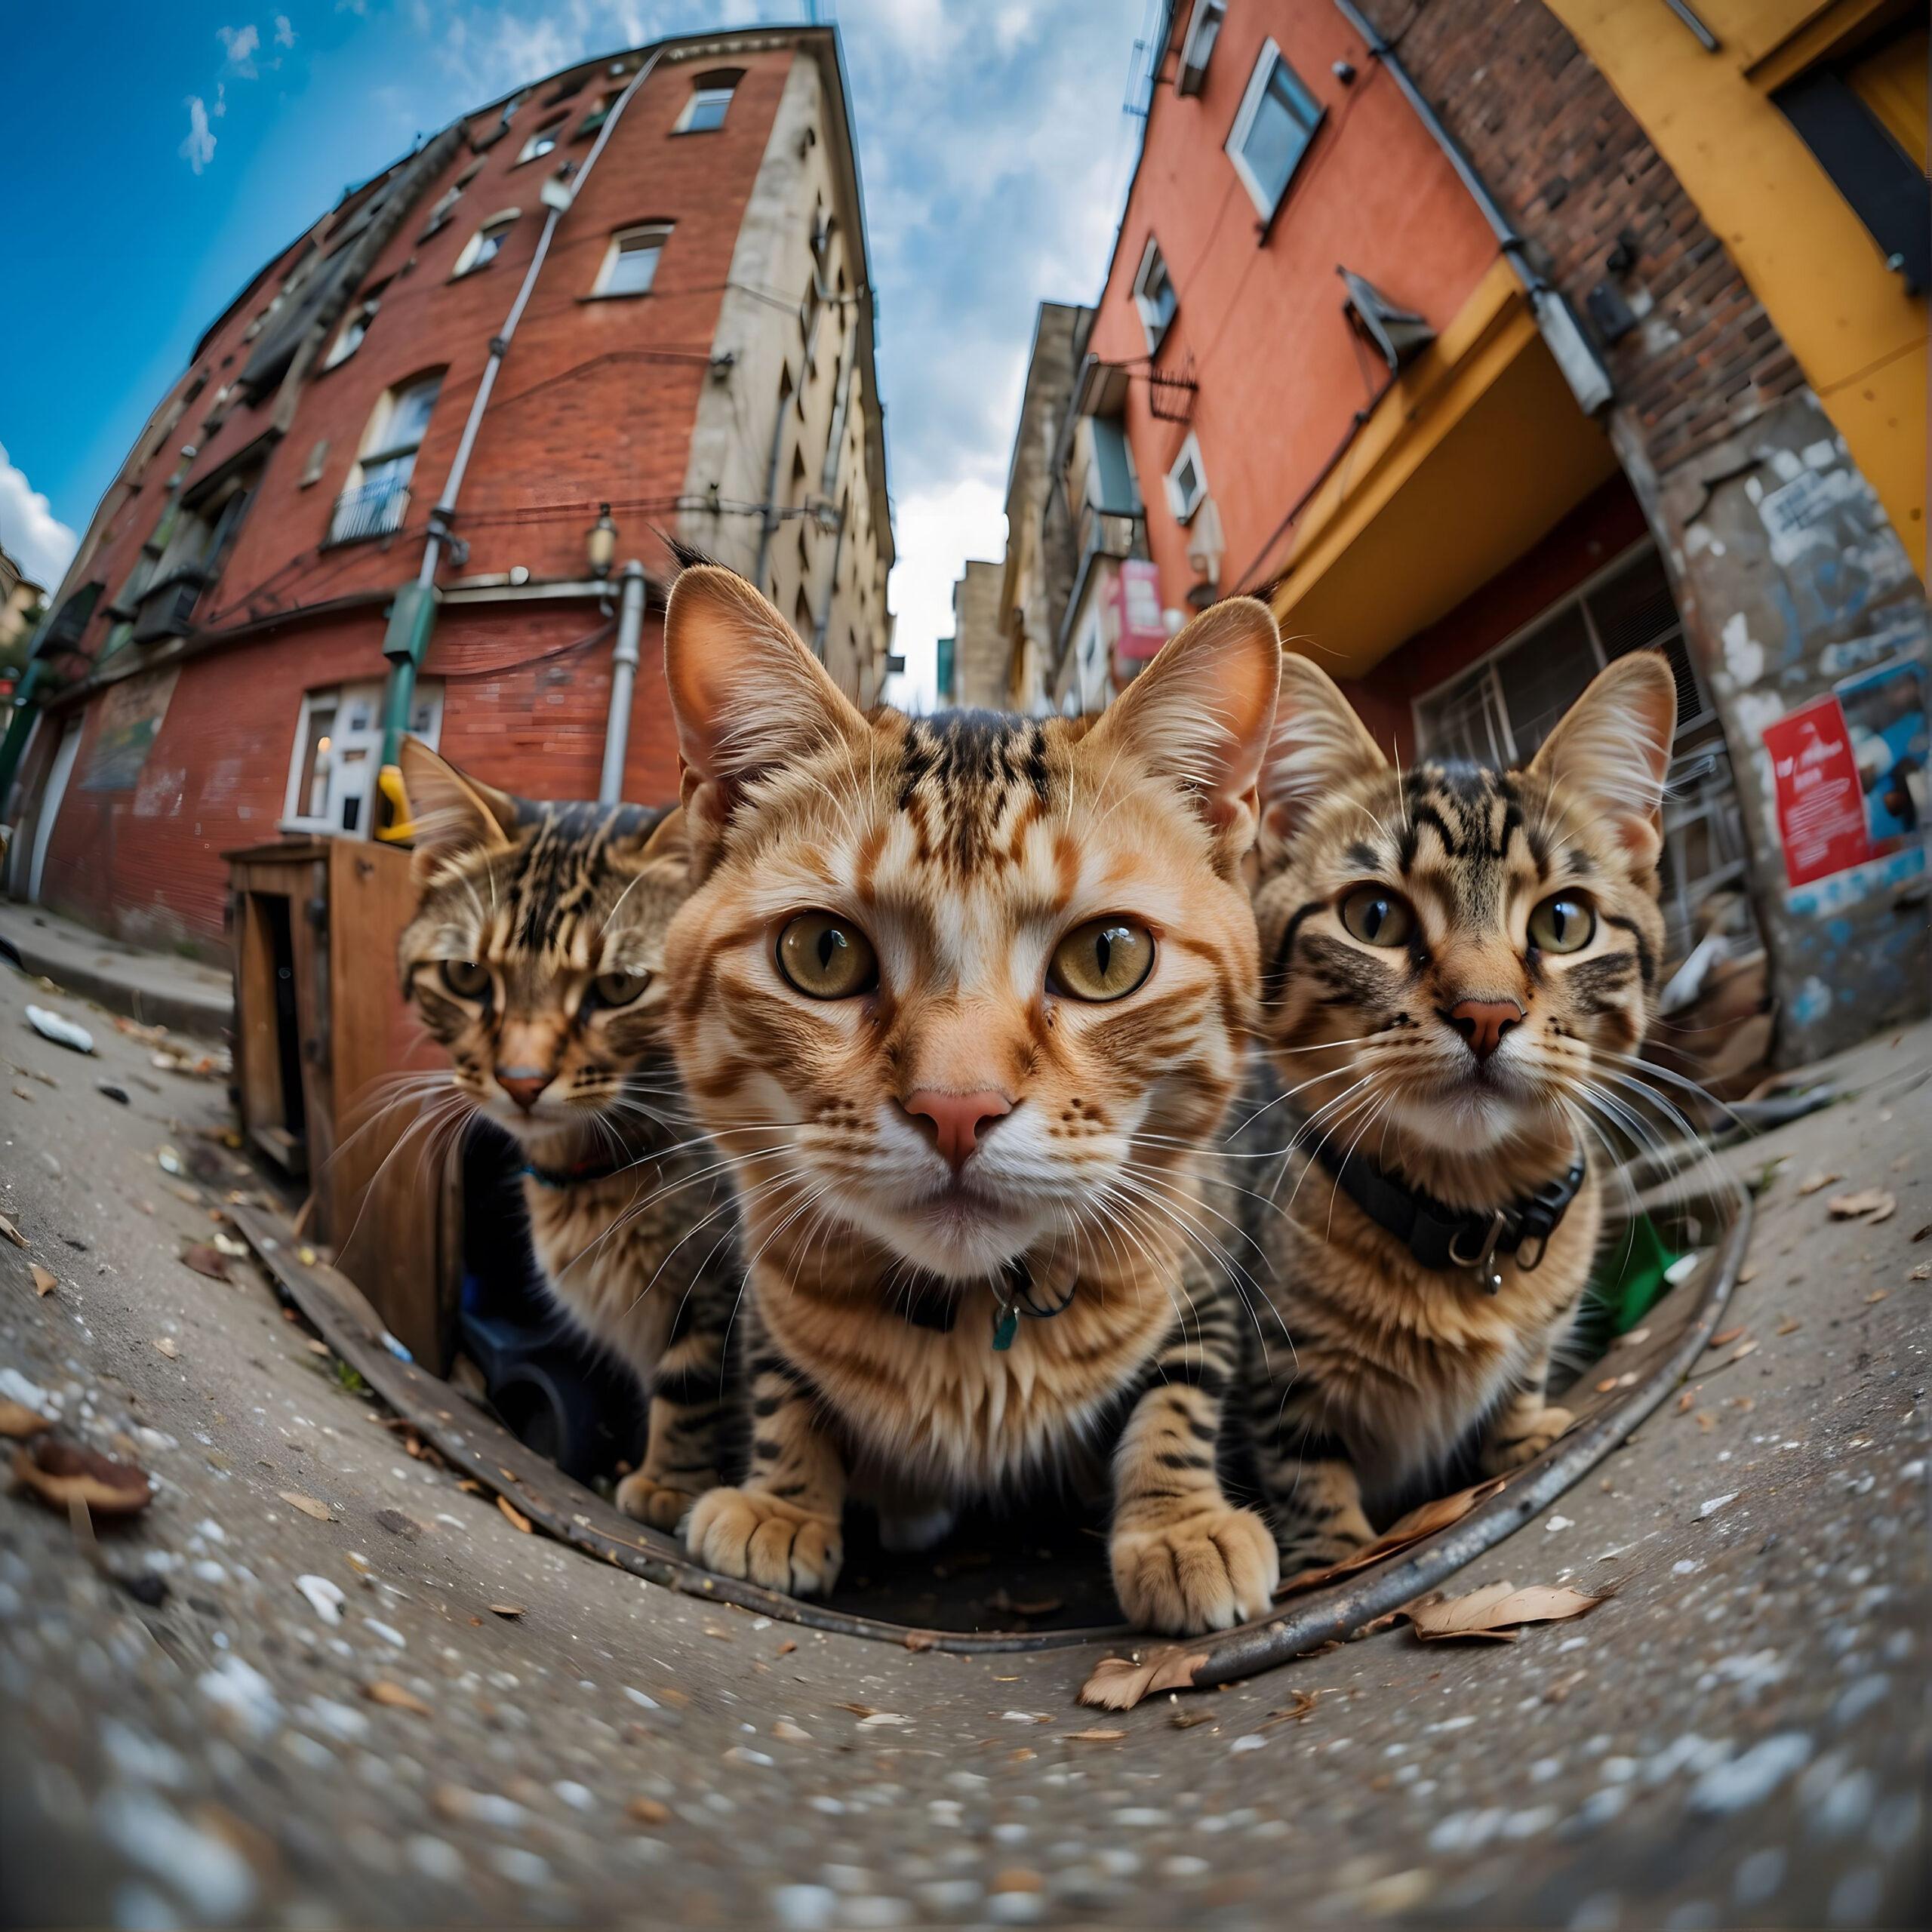
Here’s the image we’ll be working with:

Step 6: Upscaling (Image enlargement)
There are several types of upscaling, the most common being image interpolation, which adds pixels between each pixel of the original image using an algorithm. This is the simplest and fastest solution.
This function can be found in almost all image editing software. The result is often correct, depending on the size of the original image and the final size of the enlarged image. But if the image is enlarged too much, it will become blurred and lose fine detail.
With advances in artificial intelligence technology, upscaling techniques have also evolved, enabling us to achieve far better results than with interpolation in a relatively short time.
In our example, we’ll use Leonardo AI to upscale our image, namely “Alchemy Upscaler”, to get maximum detail in the image. Then we’ll do another final upscale with the free “Upscayl” tool to get an image size of around 3000×3000 pixels.
Using Leonardo AI’s upscale tools
Update: Leonardo AI’s “Alchemy Upscale” function is now available for a fee. However, you can continue using Upscayler (see the Upscayl chapter below).
When using Leonardo AI, the default image size is 1024×1024 pixels for large-format templates [Leonardo_Diffusion_XL], which is suitable for the majority of image generation needs.
With the help of these templates, Leonardo AI can increase the resolution to a maximum of 1496 x 1496 pixels. We’re going to do this in order to get as much detail as possible and achieve optimum image quality before final upscaling.
To start upscaling, nothing could be simpler. Go to the gallery of images you’ve generated and click on the one you wish to upscale. Then click on the upscale button at the bottom of the image [Alchemy_Upscale], and Leonardo AI will start upscaling the image:
Once the upscale is complete, you can preview the enlarged image by selecting it from the drop-down menu to the left of tools (1 & 2):
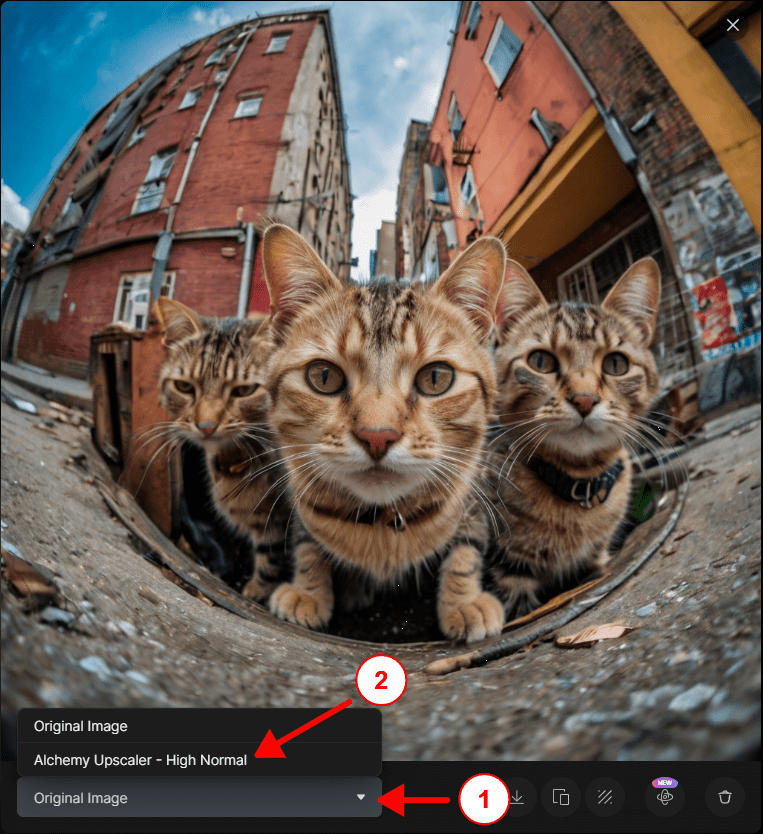
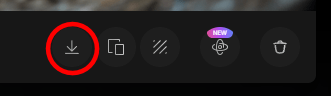
You can download it by clicking on the download icon to the right of the drop-down menu:
And here’s the final result of our upscale:

Click to enlarge
Using an Upscaler
In addition to Leonardo AI, there are a number of free and paid tools available for upscaling without having to go through an interface with parameters that are sometimes complex to adjust. All you have to do is import the image to be upscaled, select a destination size and start rendering the image.
These tools don’t take into account the context of the image as Leonardo AI does, and they don’t add detail. They merely enhance existing ones, as they are not image generation software with an integrated image prompt.
Even if some upscaling software does manage to enhance details like faces or tree leaves, for example (let’s name Topaz_Gigapixel). It would be preferable to have an image generated at a size of 1024×1024 with fine details and to perform an initial upscale with Leonardo AI, before upscaling with these tools.
Upscayl

Upscayl is an excellent choice, and it’s free! This open source software exploits artificial intelligence to improve image detail during the upscale process.
First of all, download and install the software from their website (at the end of the page):
Next, launch Upscayl and import the image you’ve upscaled with Leonardo AI by clicking on the [Select_Image] button. Find the image on your hard disk and confirm its import. Alternatively, drag & drop the image into the Upscayl window to import it.
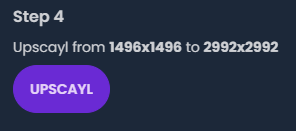
In the left-hand panel, click the [Settings] tab at the top to customize the upscale values in the [Image_Scale] parameter. You can increase the size up to 4X to reach a size close to 3000×3000 pixels (in the [Upscayl] tab, in [Step_4]). If your image is 1496×1496 pixels, select 2X :
Always in the [Upscayl] tab (to the left of [Settings]) and select the upscale model (in [Step_2]). You can test the different models available and use the one that suits you best, or simply leave the basic one.
Finally, click on the [UPSCAYL] button at the bottom to start upscaling. Upscayl will then upscale the image using AI to preserve quality and detail. The time required for upscaling will depend on the size of the image, your chosen configuration and the power of your computer’s graphics card.
Once processing is complete, you’ll see two versions of the image, the original on the left and the upscaled version on the right. You can zoom in on the image to appreciate the details by moving the vertical ruler to compare the result of the image before/after upscaling:
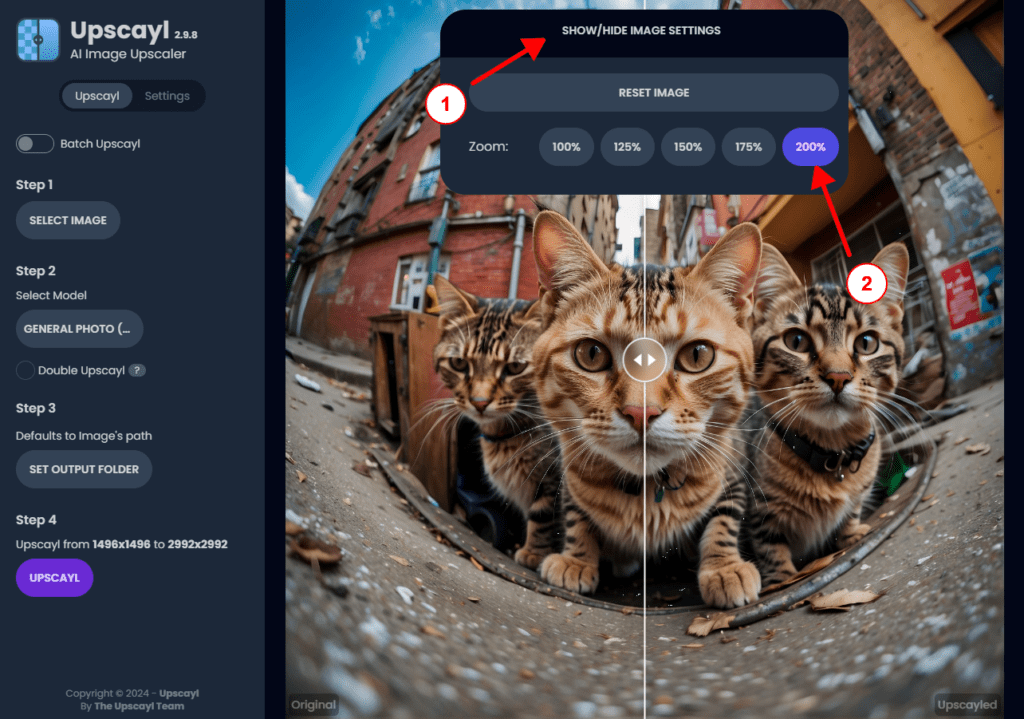
The upscaled image should be saved directly to your desktop. You should obtain a large (close to 3000×3000 pixels), highly detailed image:
Click to enlarge
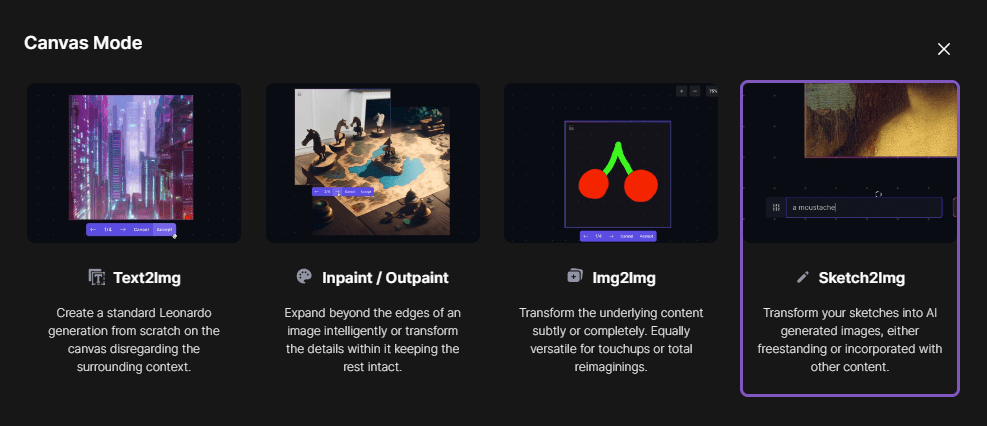
Step 7: Inpainting
Inpainting is a technique for generating localized images within your picture, a bit like photomontage in Photoshop. It also allows you to remove, add or modify certain areas of the image and correct certain defects (for example, removing a person’s sixth finger).
Image generation and inpainting are distinguished by the fact that you can ask Leonardo AI to retain part of the original image to preserve shapes and colors, or to base itself on a drawing. It’s the latter technique that we’re going to use.
In this tutorial, we’ll concentrate on adding elements to the image and not on modifying it. If you wish to correct details in the base image, you’ll need to use [Inpaint/Outpaint] in [Canvas_Mode], not [Sketch2Img] as mentioned later.
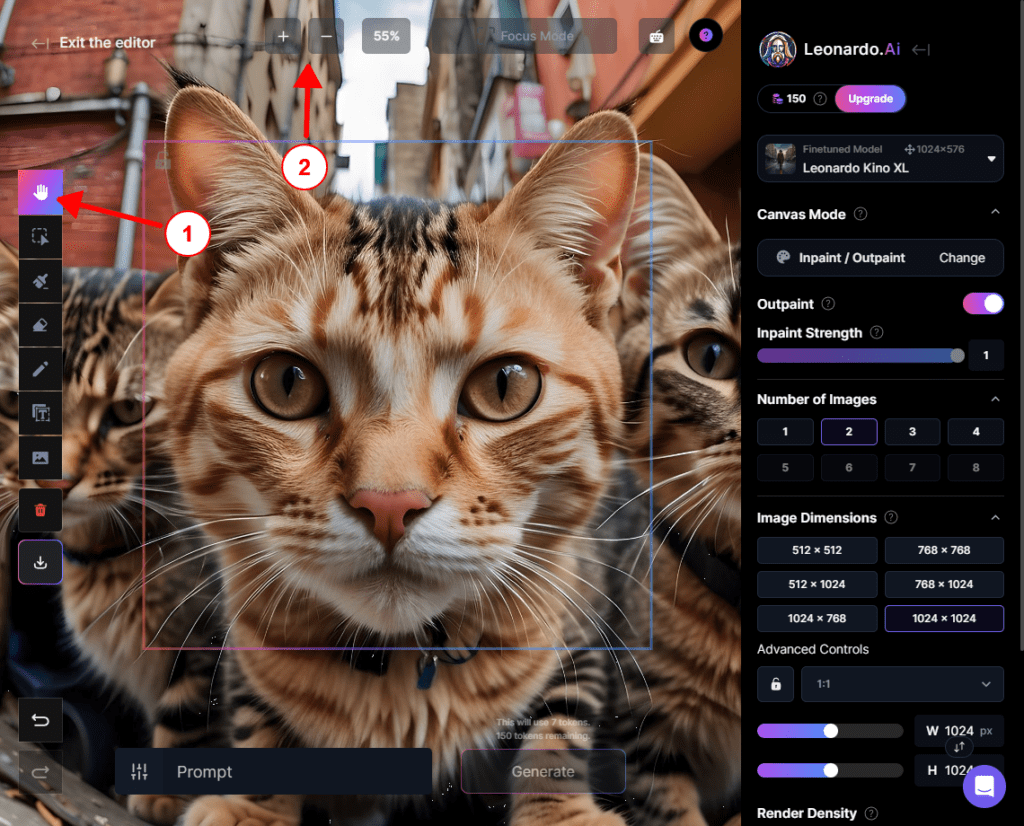
Return to the Leonardo AI home page by clicking on the logo in the top right-hand corner:
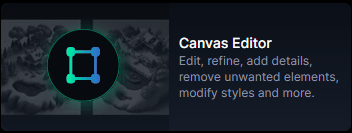
Then, this time, click on the [Canvas_Editor] button:
You will be presented with this interface:
In the center is the generation frame, which is the working area in which Leonardo AI will work; portions outside this area will be ignored during generation. In order to obtain the greatest possible detail during generation, you need to use as much of this space as possible.
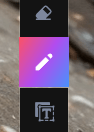
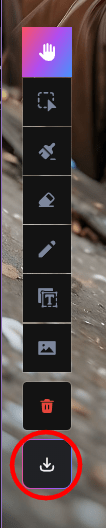
The tools for interacting with the image are located on the left, in the following order:
- Hand, for image navigation (default tools)
- Selector, for selecting, moving and resizing images imported or generated from the workspace.
- The paintbrush, used to draw a mask for inpainting if you wish to delimit the area to be modified
- The eraser, to erase portions of the image
- The pencil, for drawing directly on the image (not to be confused with the brush)
- Text tool, for writing text on the image
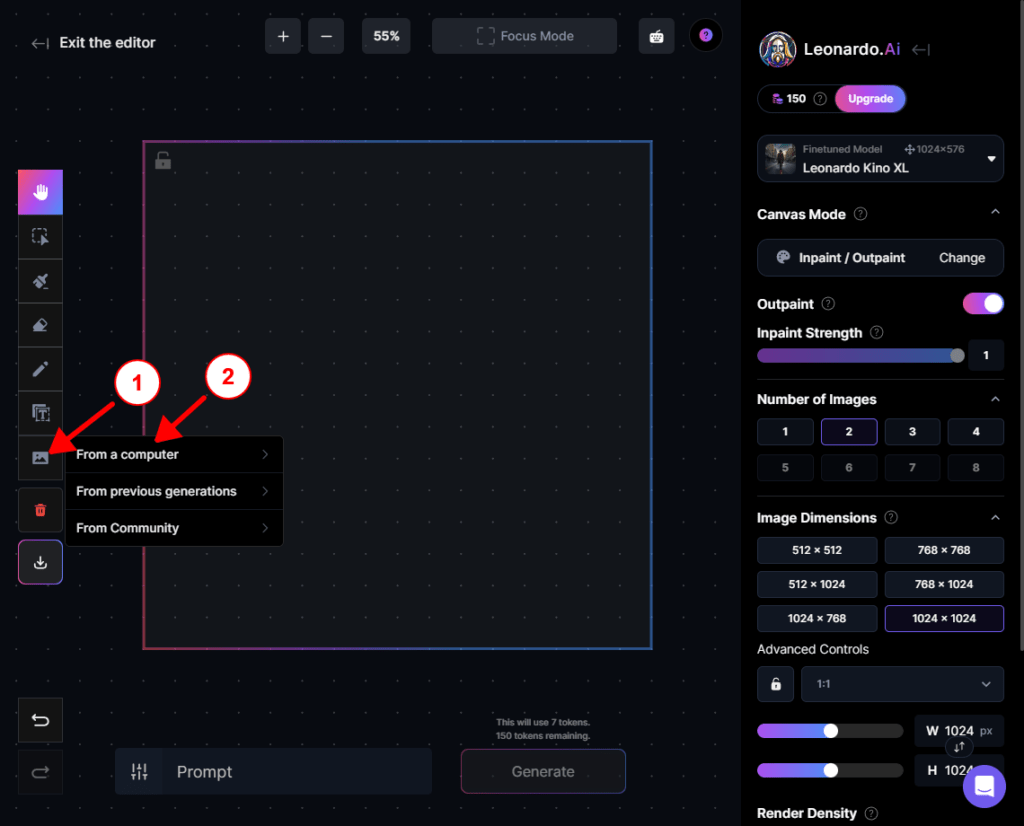
- Image import, to add an image from your computer or from your library of images generated with Leonardo AI.
For our example, we’ll import the image upscaled previously in Upscayl (3000×3000 pixels). To do this, click on the image import button (1), then click on [From_a_computer] (2), select your image from your hard disk and confirm:
The image should appear in the generation frame:
Now we can add elements to our image. If the template you’ve chosen allows it, select the size 1024×1024 (in [Image_Dimensions]), you can always change the template in the top right-hand corner of the image.
To choose between several generation results, leave “2” or “3” in the [Number_of_Images] section.
Next, change the Canvas mode by clicking on the [Change] button in the right-hand column in [Canvas_Mode] :
Then select [Sketch2Img] on the far right:
The drawing
We’re now going to roughly draw the element we want to integrate into the image. Do your best, but you don’t have to be Michael Angelo or Leonardo DaVinci 😉. Think about the size, position and color of what you’re drawing, especially if it’s a character.
To be precise in your actions, zoom in or out on the area you wish to modify by clicking on the “+” or “-” button at the top of the window:
Then adjust the zoom (2).
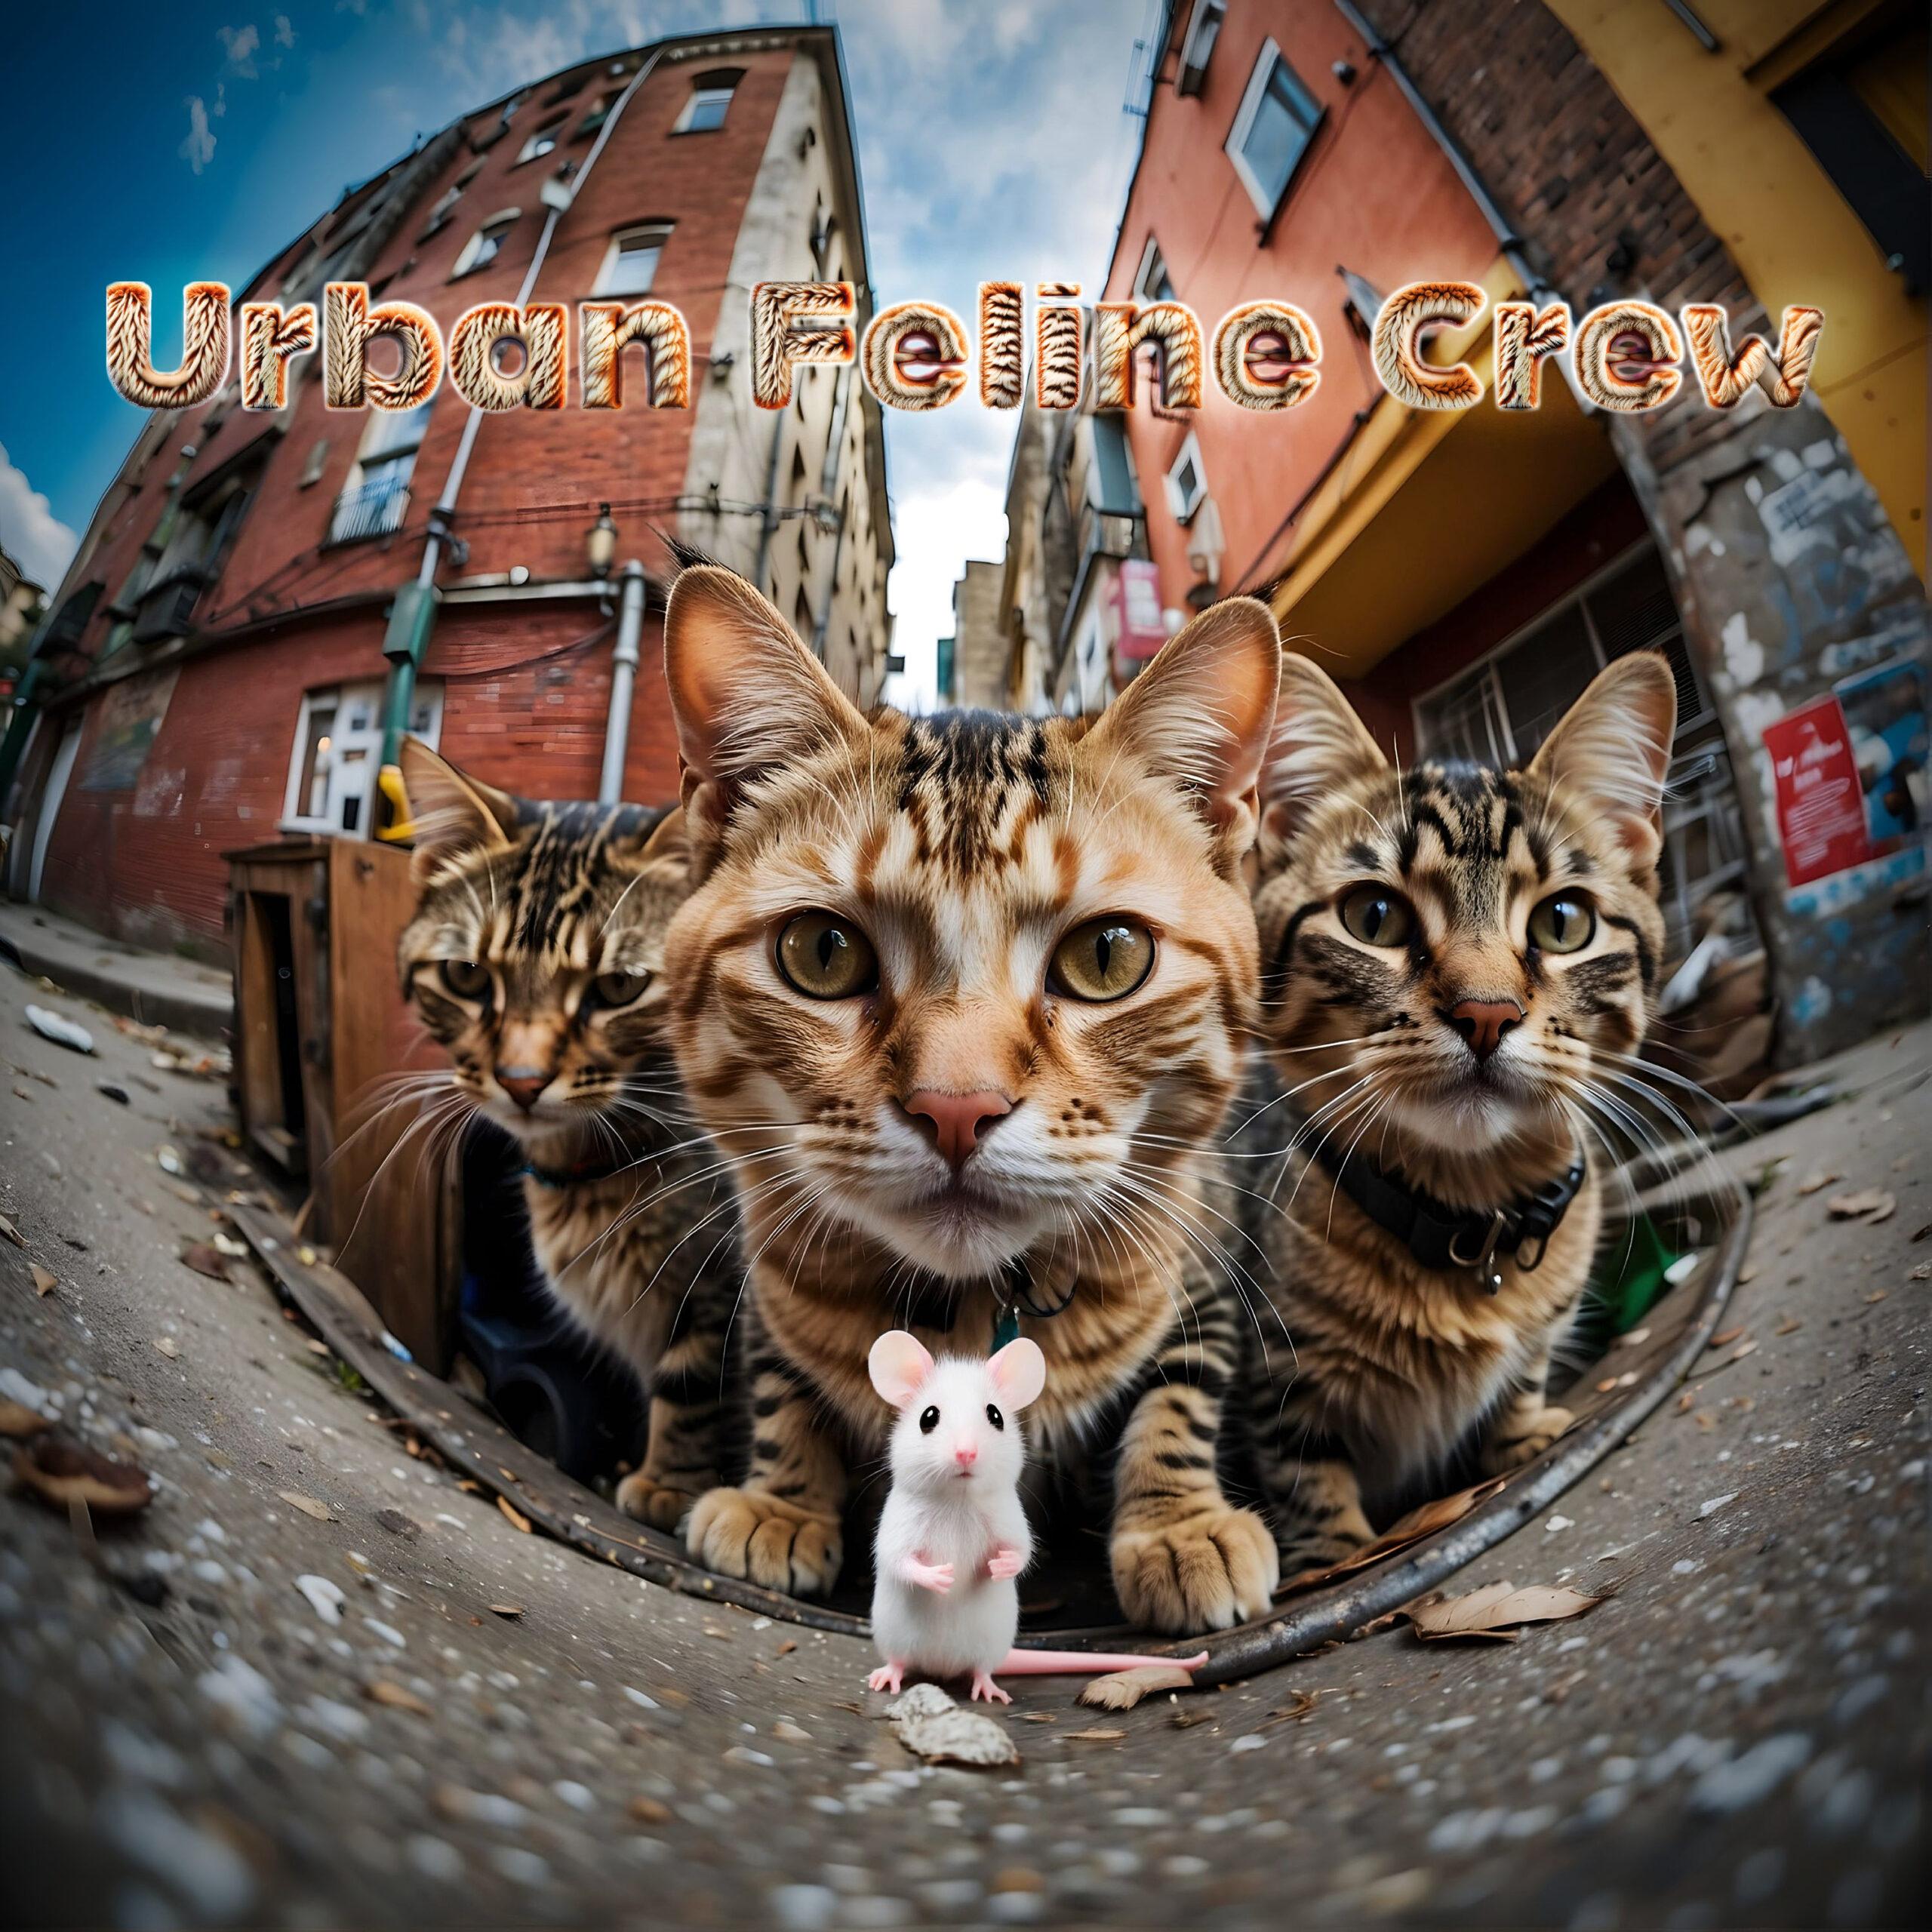
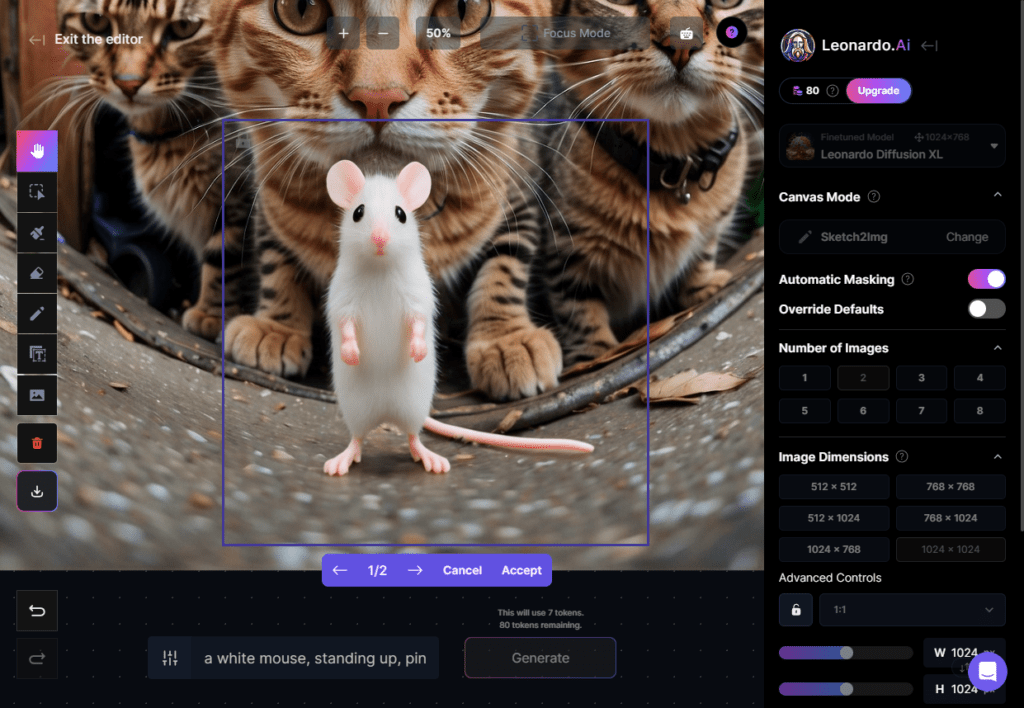
Next, click on the Pencil button (left) and draw what you wish to integrate into the image, making it sufficiently representative for the AI to interpret it correctly. In our example, we’ll draw a white mouse standing 🐭.
As you draw, you can change the color and size of your brush in the bar at the very top. Click on the color square in the bar and choose a color, then drag the horizontal slider to set a pencil size.
Watch this short video:
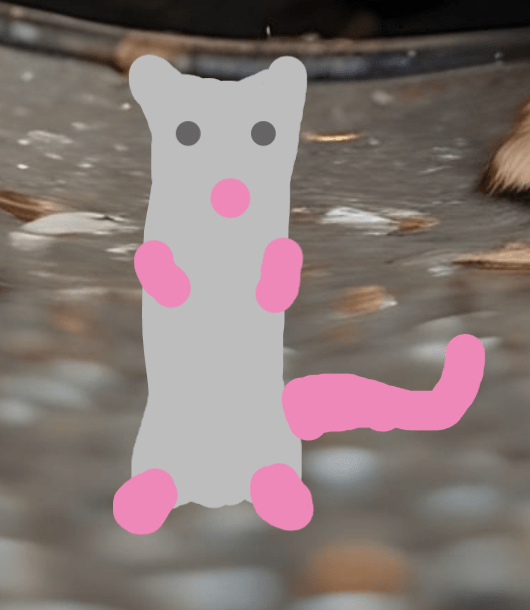
In 2 minutes you should have a very basic drawing, but enough for the AI to interpret correctly.
If you want to edit your drawing (to enlarge it, for example), you’ll need to make a few manipulations. The problem is that Leonardo AI doesn’t have slap management, so you won’t be able to select only your drawing to move or enlarge it 😕.
To get around the problem, move your background image (the cat image in this example) as well as the frame. Then click and drag to select your design. This will allow you to move, enlarge or distort it as you wish 🙂.
The next step is important for a good result. We’re going to center the drawing to use as much of the available space in the generation frame as possible.
Here’s a video demonstration:
If in this example we wanted to make the mouse even bigger, we’d simply have to reduce the size of the background image.
Here’s how to do it on video:
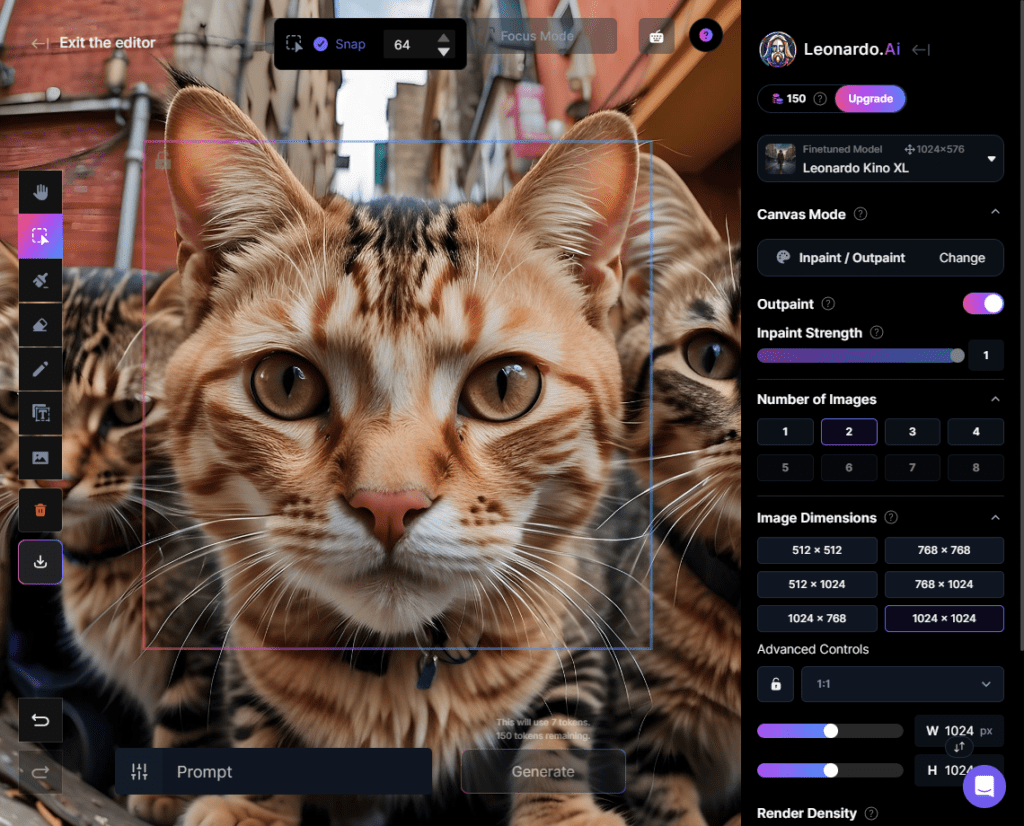
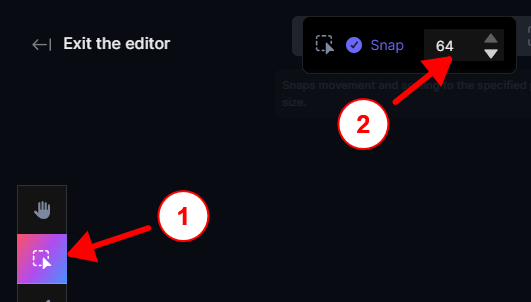
To be more precise when moving selected elements, use the selection tool (1) and then set the movement magnetism with [Snap] to 64 (2).
Finally, enter a Prompt corresponding to your request in the field at the bottom, in our example :
a white mouse, standing up, pink tail and nose
You’ll be able to choose a template for inpainting in the top right-hand corner, just as you did when generating the base image. Choose a template that matches the style you’ve chosen, to maintain a certain consistency of style. You can also be creative and try out different mixed styles (photo, manga, painting, 3d).
Click on “Generate”, and after a few seconds you should have your inpainting results.
Choose from the results by clicking on the arrows below the frame, then click [Accept] to validate your choice. If you don’t like any of the results, you can click [Cancel], modify your Prompt, improve your design or change model and start the generation process again.
Once you’ve finished adding elements to your image, you’ll need to resize the background image approximately to its original size, taking care to select everything. You can download your final image by clicking on the download button at the bottom of the toolbar. Make sure you have an image size of 3000×3000 pixels or slightly larger after downloading.
You should now have a more than satisfactory image. Of course, it’s possible to do things differently, but this way you retain control over image composition, dimensions and colors, which isn’t always the case with generating your starting image. It takes a little more time, but in the end, you’ll get the image you want faster.
Now that we’ve got a decent image, let’s see how to integrate text and finalize our album cover!
Step 8: Text integration
When it comes to adding text (album title, artist name, etc.), you could simply use a simple online image-editing tool and write the text you want. But if you’re feeling creative, let’s take it a step further 🎨.
This step is not compulsory, and you can go straight to step 9 of this tutorial if you don’t want to include any text.
FireFly
To write original text, we’re going to use Adobe’s artificial intelligence, called “Firefly”. You’ll need to log in or create a free account on the Adobe website.
Firefly is an online tool for generating AI-generated images in the same way as Leonardo AI, but also stylized text with texture. For our example, we’re going to write the artist name of our group of cats and apply a fur effect to the text 😸.
To get started, go to this address
Next, enter the text you’d like to use for your image in the field at bottom left (1). In our example, we’ll use “Urban Feline Crew”. Next, enter your [Prompt] field (2) with the texture you’d like for your text and click [Generate] (3).
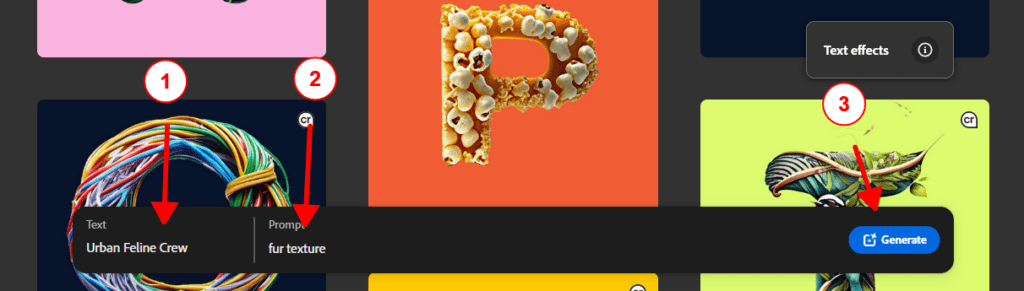
At this point, you’ll need to log in or create a free account to access the tool. You’ll have a total of 25 free credits, enough for our needs.
Once you’ve logged in with your Adobe account, your text should appear in the window with a checkerboard background:

Choose the typeface of your choice by clicking [View_all] in the [Font] section in the right-hand column:
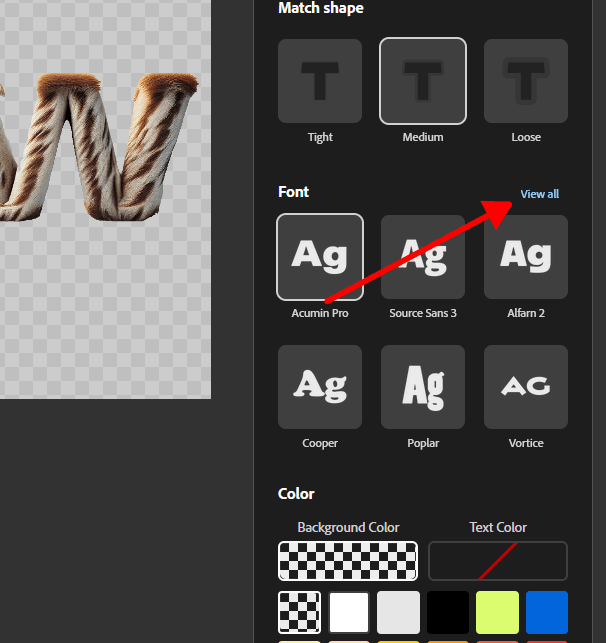
Click on the typeface of your choice, then click [Generate] again.
Once you’ve finalized your text, you can download it by clicking on the button at the top of the image (1) when hovering over it, then on [Download] (2) :
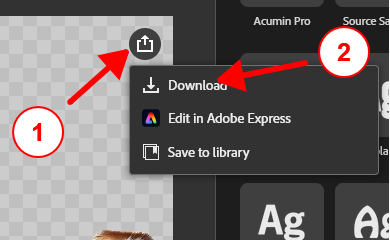
A message from Adobe about images generated by IA will appear. Click on [Continue].
You should now have downloaded the text image to your download folder.
Step 09: Finalization
We’re almost there – all that’s left is to assemble our image and the textured text to finalize our album cover.
Pixlr Express
Pixlr is a versatile and intuitive online tool for image editing. With its range of powerful tools and user-friendly features, Pixlr lets users retouch, manipulate and create images with ease. Most of the tools are free, and we don’t even need to create an account!
Go to the Pixlr Express website :
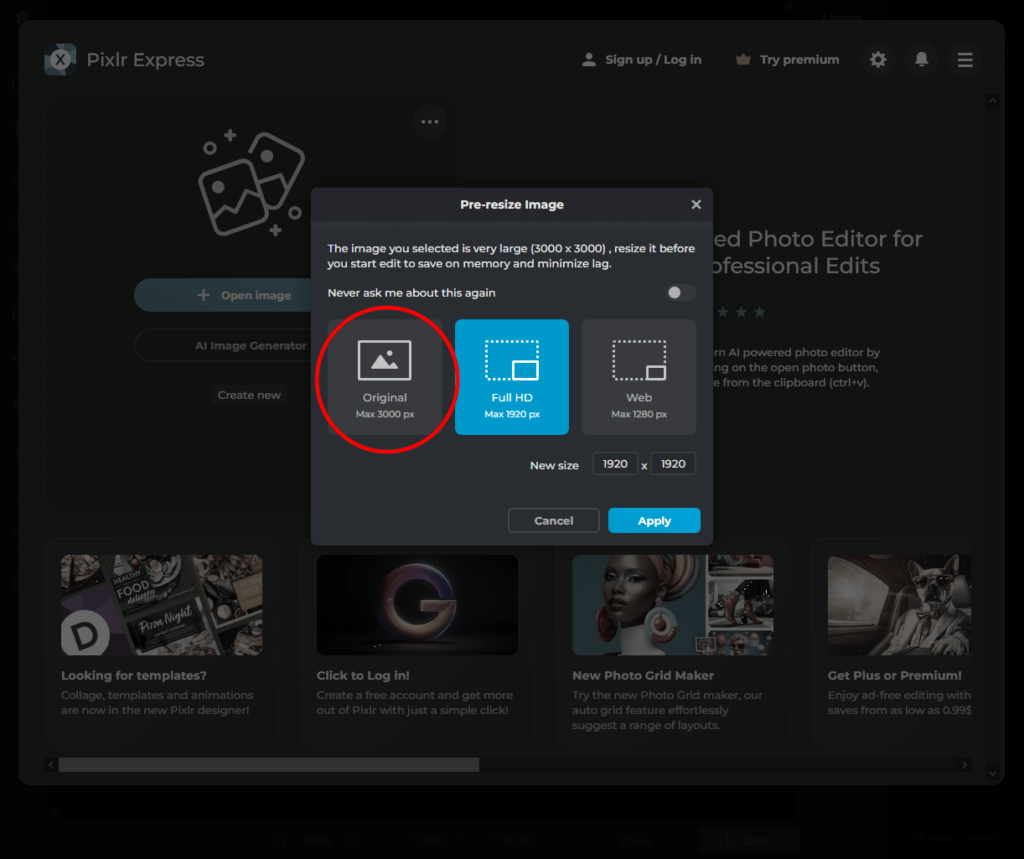
Then click on [Open_image] or drag and drop the image you’ve just downloaded and select [Original] when importing the image:
Your image will appear in the Pixlr interface, then click on the “+” button in the top right-hand corner of the interface, in the slider column, then click on [Image] :
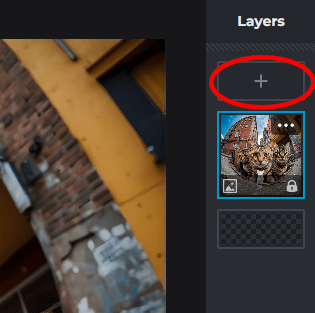
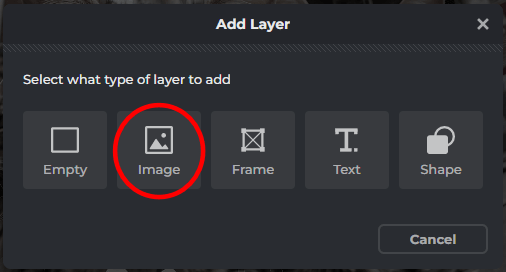
Finally, select the text image you generated with “FireFly”. You can also import the image by clicking and dragging it into the Pixlr interface and then clicking on [Add_Current].
Then move the text image wherever you like(video):
To remove the Adobe logo from the text image (bottom right), make sure you’ve selected the right layer in the right-hand column, then select the [Drawing] tool, click [Eraser_Tool] and erase the logo from the bottom left of the image, as shown in the video below:
Tip: use the scroll wheel while pressing the [Control] (Ctrl) key on your keyboard to zoom in/out of the image, and hold down the Space key on your keyboard to navigate around the image by clicking and dragging.
By playing around with the various effects available in the left-hand column, you can adjust contrast, brightness, color and other snapshot parameters to finalize your image to your liking.
Click on the effect settings button, select the layer you wish to modify and change the parameters shown on the right to observe their impact on the image:

After a few minutes, you should see a similar result.
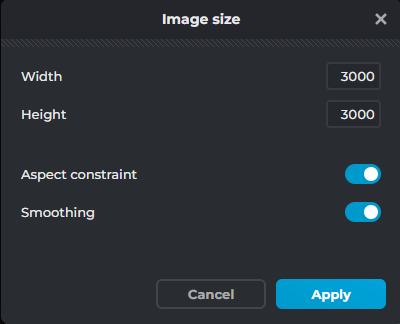
To resize our image to a final size of 3000×3000, click on the [Crop] button (1) and then on [Image_Size] (2).
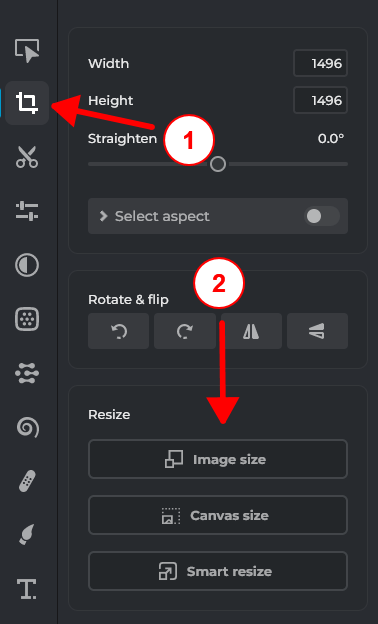
Enter 3000 in the size fields and click [Apply]:
Finally, click on the [Save] button at the bottom right of the interface and [Save] to save the image on your computer.
And that’s it, you’ve created your own album cover! Congratulations 👏🏻!
Conclusion
Like any artist, you have a certain idea of what your visual identity should look like, and the same goes for your “Cover Arts”.
Nowadays, even if you’re not a painter by nature, a simple text describing the image you want to achieve is enough to create superb images in no time.
As artificial intelligence has rapidly become a remarkable tool, with online solutions becoming more widely available, it is positioning itself as a versatile, powerful and fast tool for anyone wishing to create an image, whatever the medium.
AIs will undoubtedly have an even greater impact than the Internet, and it’s important as an artist to keep abreast of new technological developments, all the more so if they can influence our work… or even replace us 🤖.